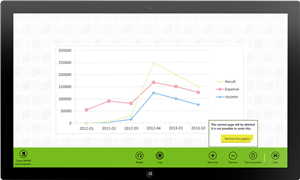
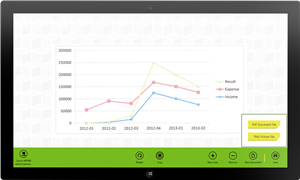
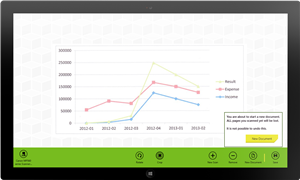
Download from Windows Store

ScanAir's User Manual

Screenshot

First Contact

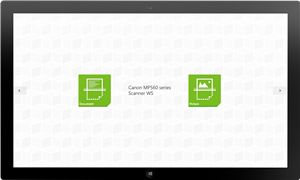
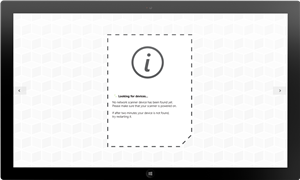
When the app is started it immediately starts to look for compatible scanner devices on your network. This typically takes only a few seconds but might also take up to two minutes.

Remark: the app will inform you if you are not connected to any network. As network connectivity is required, please make sure that the air plane mode is disabled and that you are actually connected to a WiFi network.

Screenshot

Home Screen

As soon as a compatible scanner has been found, the home screen appears. The two buttons triggers digitization: the left one for documents and the right one for pictures. Between the buttons he name of the scanner device is displayed.

To use another scanner device, show the app bar and click the button at its left. It opens the list of detected devices. You then only have to click the one you want to use.

Screenshot

While Digitizing

Digitization is a slow operation during which the app only shows you a wait screen. You can cancel the digitization at any time using the Cancel button.

As soon as the acquisition has been completed the document or picture is displayed. The app adapts the zoom to show you it whole.

Screenshot

More Pages?

To digitize several pages and save them in one single PDF file all you have to do is to slide the current page to the left: this shows the home screen again.

Tip: you could also display the app bar and click the + button.

Screenshot

Rotate and Crop

Show the app bar and click the Rotation button. Each click while turn the page of 90 degrees clockwise.

Show the app bar and click the Crop button. Move the four white circles to select the area you want to keep. You can also move the whole area.

To validate your selection, show the app bar and click the Apply button.

Info: the app actually keeps the original image in memory until you remove the page or create a new document. This allows you to change the selected area again at any time without have to digitize again.

Screenshot

Delete a Page

To delete a page you'll have to navigate to it. Then show the app bar and click the Remove button.

Beware : you won't be able to undo this

Screenshot

Save and Share

As you have digitzed all the pages of your document, you can either save it to a file or share it using another app.

Show the app bar and click the Save button (rightmost). If your document has only one page you'll have to choose between a PDF or PNG file. Documents with more than one page can only be saved as PDF documents.

Then choose where the file has to be saved and how it will be named and click OK.

The save operation starts and you can monitor its progress. No success confirmation will be displayed but in the event of an error you'll be informed.

Instead of saving the scanned document you can also only share it with other apps (e.g. Mail). To do this open the charm bar and click on Share.

Screenshot

Start a New Document

If you are done with the current document and whish to start a new one please show the app bar and click the New button.